Friday, June 23, 2006

Geometry and Edheads

I wanted to extend a warm welcome to all of the new folks who have been stopping by. I hope you'll find some of this information helpful. If you have a great resource you want to share or just want to say "Hi" please feel free to leave a comment. I'll highlight any great resources shared in the next post.
- Enjoy!
Cindy


PowerPoint and Geometry

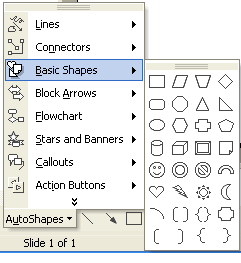
You can use the autoshapes in PowerPoint and Word to help students learn basic concepts in Geometry.
**Note: If you don't see the drawing toolbar on your screen click on View--> Toolbars--> Drawing.
Here are some examples of what can be done:
1. Have students use the tool to draw various polygons. Then have them label the number of sides and corners.
2. Test to see if little ones know their shapes. You call out a shape and they must use the tool to draw it on their screen.
3. Use the Autoshape and line tools to check for symmetry.
4. Great tool for teachers to use when creating assignments for students.

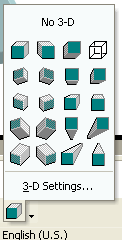
Beyond the basic autoshapes, you can use the 3-D tool with squares and circles to make cubes and cylinders ( don't use the cube and cylinder in autoshapes for this the 3-D settings won't work).

1. Have the students draw a square.
2. Click on the 3-D icon on the drawing toolbar and select the depth and angle for their 3-D shape.
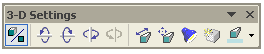
3. Next click on the 3-D settings tab. The toolbar will appear.
4. Use the arrows to rotate the figure for examination.
5. Use the light source to play around with shadows.

Students can then label their figure and write about what they did.


Cool Site
One of my favorite science sites of all times is
Edheads http://www.edheads.org/activities/simple-machines

This is a fun interactive demo that teaches students about simple machines. They are taken to different locations throughout a house and have to locate all of the simple machines in the room. The great thing about this activity is that it comes with a teacher guide, lesson plan and glossary.

Another activity on the site is Odd Machine. While the simple machine activity is best for elementary. This activity may be better for older elementary or middle school, although the younger ones would certainly enjoy it. It discusses the application of various forces such as friction, gravity, push, and pull. Just like all of their activities, this one is fun and engaging.

Until next time...
Happy Clicking!

Cindy

Friday, June 16, 2006

Planning for a New Year

Once things finally close from this school year, it's time to look ahead to the next. The best way to plan for that new school year is to reflect upon what worked best/worst this past school year. To get started, break your role down into major chunks. Let's say you are a technology facilitator and manage a computer lab. Here are some topics to consider:

Management of students: behavior, movement, asking for assistance, saving work, following directions, using computers or peripherals in general

Management of computers: saving work, locking settings, navigating to folders, software, hardware, resources most/ least used, resources needed

Working with staff: planning, collaboration, training, sharing of student work, scheduling

Activities: what worked best/ worst, resources used, best websites, resources needed, were activities integrated, did I meet all curriculum goals


As you go through each topic, make sure you write down what you discover. These notes then become valuable planning tools for your new year.


Here are some web resources that can help you as you work through each topic:

Regional Educational Technology Consortiums - http://www.retc.org

Collaboration: IMPACT for Teachers-
http://www.ncwiseowl.org/kscope/impact/

Classroom Management in Computer Labs-
http://www.indiaeducation.info/teachers-corner/articles/classroom.asp

Managing Students With Computers-
http://www.thirteen.org/edonline/ntti/resources/workshops/
managing_students/practice.html


Cool Tool
Do you Squidoo? Everyone is an expert on something. Squidoo provides you with a means to share your expertise with others by creating a Lens that lets others look into your world. Check out my Lens for Teaching 'N Technology - http://www.squidoo.com/teachingntechnology

Until next time...
Happy Clicking!

Thursday, June 15, 2006

Switching Over

In this post, I'll be moving my entries from my computer lab survival blog to this one. The Blogger format allows more options and is easier to use.

Here are my previous posts:

09 Jun 2006 08:19:43 pm
Google Spreadsheet and Microsoft Photo Story 3
Cool Tools

I just love it when someone introduces me to new tech toys...especially if they are free! The latest items that have been shared with me are Google Spreadsheets and Microsoft Photo Story 3.

Google Spreadsheet is currently found under the Google Labs section and is there for a limited test. http://labs.google.com/ You can sign up to receive and invitation. The coolest feature of Google spreadsheet as far as I can tell is that it can be easily shared with others online. It's definitely worth a look.

The other tool is a free download from Microsoft called Photo Story 3. http://www.microsoft.com/windowsxp/using/
digitalphotography/photostory/default.mspx
It's actually been around for a little while, but I had completely missed it. I can see this as a wonderful classroom tool though. It's simple enough that even young students could create their own photo slide show complete with the background music of their choice.

Here's the down and dirty version of what to do.
1- Import your pictures.
2- Edit them right on the screen.
3- Add titles to pictures and add your desired effect such as sepia, black and white etc.
4- Customize the motion of the pictures and record narration. You can zoom in and out and add transitions in this step.
5- Select pre-recorded music or create your own. There are several styles of music available.
6- Decide how you want to save your file.
It really is that simple! I can see this as a substitute for some of the powerpoint displays we try and have young students create. If your goal is to create a slideshow type movie, this is definitely the best way to go. If your goal it to print what the students have created then stick to PowerPoint.
Until next time...Happy Clicking!
Cindy

02 Jun 2006 08:25:35 pm
Technology Handbook for Teachers
Does your school or district have a central location where staff can access basic information regarding technology services? You may want to consider setting up a media/ technology handbook.
What could a media / technology handbook contain?
- Policies and procedures
- Commonly used forms
- Lists and descriptions of available software and equipment
- Troubleshooting procedures and information
- How To guides for software and hardware
- Copyright info
- Best Practices for Technology Integration
- Integration resources
- Websites...the list goes on and on

There are quite a few good resources available to help you get started. The University of Memphis and the Appalachian Technology in Education Consortium have a great integration guide called Teacher's Technology Handbook. http://idt.memphis.edu:16080/~jpcheon/teacherhandbook/
The Northwest Regional Technology Consortium also has an integration guide.http://www.netc.org/focus/
Regional Technology in Education Consortiums across the U. S. have tons of information regarding the use of technology in schools.http://rtec.org/
To get an idea of what a media /technology handbook could look like, Google the term "media center handbook" and you'll find tons of resources.

Cool Tool
A good way to gather all of the resources you find on the topic is to utilize a tool found in Google Labs called Google Notebook (http://labs.google.com/). It allows you to quickly pull together links and specific information on a particular topic. I've just started playing around with it and I love it!Until next time...Happy Computing!!Cindy

26 May 2006 06:17:39 pm
Classroom Blogs
Happy Memorial Day Weekend! Since we have a long weekend, I'll keep the post short. This official start to the summer season means we're in the home stretch! Vacation is almost here. Woo Hoo!This week I'll share with you a little bit on Blogging.

Since their introduction to the world, blogs have slowly and steadily made their way into the educational community. But even with the uses found for blogs in education, many are still left to wonder how a blog could be beneficial for their classroom.
Here are a few ways blogs are being used in the classroom:
1. Student/ parent communication- Blogs are a good tool to keep parents up to date on classroom happenings. Students can contribute blog articles like a class newsletter. Comments allow interaction with parents as well.
2. Posting homework- Since blogs allow for continuous update usually with the most recent entry at the top, homework can be posted either daily or weekly.
3. Student writing- Some language arts teachers are using blogs for writing exercises. Students can write online and the teacher/ classmates can comment, edit or critique the text.
4. How Tos- You've introduced a difficult concept in class. You want to make sure students can access the notes or a tutorial to help them remember what to do once they leave class. Blogs are the perfect place to post the tutorial. It also provides students a place to post questions or tips to help others "catch on".

This is just the tip of the iceberg. There are much more creative ways blogs are being used in education. One of my favorite education blogging sites is David Warlick's Landmark Class Blogmeister - http://classblogmeister.com/. There is lots of information as well as a place for teachers to sign up for their own classroom blog. Take a little time to explore the possibilities!Have a good long weekend!Until next time...happy clicking!Cindy


18 May 2006 08:47:59 pm
Who Am I?
Here's another fun end of the year project using a digital camera.

Project of the Week
We've all seen the books that show a small portion of something and you have to guess what it is. You can take that same concept and have your students create a book about their classmates. What you'll do...
1) Have the students work in pairs- so assign or let them choose a partner.
2) The students will use the digital camera to take two pictures of their partner.
a) The first picture will be of some part of their partner such as their nose, eye, hand, mouth, etc.
b) The second picture will be a head shot. (from the partner's shoulders up)
3) Have the students insert their pictures into a class powerpoint or slide show. They will insert the close up first. (Make sure you use slide 1 as the title of the book.)
4) On the slide with the close up, have the student type "Who Am I?"
5) On a second slide have the student insert the head shot and the text, "I am (Child's Name)."
6) You can print the book as a handout. Select 2 slides per page for a 1/2 page book or 6 slides per page for a smaller book.

Helpful Hint
After your classes are finished for the year, you may want to consider "cleaning up" your computer. Windows 98 and up allows you to complete a Disk Cleanup on your computer.
1) Go to Start--> Programs--> Accessories--> System Tools--> Disk Cleanup
2) Select the drive you wish to clean and click ok.
3) If you've never done this before or you have a lot of stuff on that drive, it could take a long time so be patient.
4) When it has finished scanning the selected drive it will bring up the amount of space that "useless" files- temporary files, recycle bin trash, etc.- are taking up on your hard drive.
5) You can then select or deselect the files you wish to delete.
6) You can view the files to see if they are files you really want to delete by clicking "View Files".
7) Once you're sure of what you want to get rid of click OK.
8 ) The computer will ask if you're sure you want to delete the files. Click Yes.
9) The computer will then begin cleaning and the box will disappear when it's finished.
Until next time....


12 May 2006 06:35:28 pm
End of the School Year Projects

Project of the Week
Here's a tried and true end of the year project that everyone loves. Create a Class Yearbook or Autograph BookYou can make this activity as simple or as complicated as your time allows.

The simple version:
1) Take a digital photo of your class.
2) Open a blank document and type the title My ________Grade Class (ex. My First Grade Class).
3) Insert the digital picture so that it takes up no more than half of the page.
4) Print the document and have each child "autograph" the bottom of the page.
5) Make black and white copies of the page so that all students will have one to take home.

More complicated version:
1) Take a digital photo of the whole class.
2) Take digital photographs of each student.
3) Open Microsoft Powerpoint
4) Insert the class photo as the background of the first slide. You can also use word art to add a title.Format--Background--Click down arrow at bottom of box--Fill effects--Click Picture tab--Select picture--find and locate the class picture--click insert--OK--APPLY (not apply to all)
5) On each slide after that, insert a student's photo. Use Word Art to type the child's name on the page. Leave enough blank spaces for students to write messages on the page.Insert--Picture--From File---find the correct Picture--Insert
6) After all pictures have been inserted print the page as a handout with 2 slides per page- for a 1/2 page book.
7) Cut the pages in half and assemble them into a booklet with the class photo as the cover.
8 ) Make enough copies for each student in the class.
9) Allow the students time to sign their page in everyone's book.

Helpful Hint
It's time to start looking through those millions of folders and documents you've created and clean out the "old junk". If you save things on your hard drive:
1) Open your My Documents folder.
2) To delete a file, right click on the file and click delete. The good thing to remember is that the document goes into the Recycle Bin before it is actually erased for good.
3) If you accidentally erase a document you needed open the Recycle Bin, right click on the file and click restore.

For all of the files left in the folder, organize them in folders so they'll be easier to find. To create a folder in My Documents:
1) Open My Documents
2) Click File--New Folder
3) Give the folder a name and press the Enter keyYou can then click and drag a file to its new home.

Until next week...Happy Clicking!Cindy
Tuesday, September 20, 2005

Introducing Document Camera and Digital Microscope to Students

When you think of using a document camera, we think of using it for just that - documents. It's the high tech version of an overhead. Just as folks became inventive with using an overhead with transparent coins and shapes, you can be creative with a document camera.

Here's an activity to try.
Take your students on a safari outside. They are looking for interesting objects to share with the class. When they return - depending upon the age of the students- have them write a few sentences to a paragraph about their object. Instead of passing the object around the class (remember your show-and-tell days) the student would use the document camera to give the class an up close and personal look at their object.

When the activity is complete students have used their...
Reasoning skills- to determine which object to present
Descriptive Writing skills - by writing the sentences or paragraph about the object
Presentation/ Public Speaking skills- by sharing the object with the class

Not to mention the fact that they just used a cool tech tool.

This activity can be modified for use with the Digital Blue Microscopes found in many schools and classrooms.

Thursday, August 11, 2005

Online Safari

Want to get up close and personal with an elephant, but can't afford a trip to Africa? Is the zoo too far away for a day trip? There is are simple online tools that can bring your students up close and personal with some wild and exotic animals. Many zoos have web cams that watch everything from naked mole rats to cheetah cubs.

To use this in your classroom, locate an animal web cam of interest. (I've listed several below). Once the video opens, right click on the image and click full screen. The image will then fill your monitor. Leave this up on your computer for students to observe. Have them write down what they observe the animals doing or have younger students draw a picture. They can make notes about behavior, habit, animal movement, or the description of the animal.

There are several good animal web cams available. My favorite links are as follows:
National Zoo Animal WebCams- http://natzoo.si.edu/Animals/WebCams/

Waikiki Aquarium- http://waquarium.otted.hawaii.edu/cameras.html

Animal Web Cams - http://www.exzooberance.com/animal%20web%20cams.htm

Toledo Zoo Cam - http://static.toledo.com/zoocams/index.php

If you're interested in more than just animals there are tons of web cams available for viewing online related to educational topics. There are cameras for cities and various landmarks. A simple search such as grand canyon web cam will help you to find any that are available.

Monday, March 14, 2005

Probability and Graphing

Materials - 10-20 unifix cubes in 3 colors per group
paper bag
sheet for tally marks and to make prediction

Procedure:
Prior to activity fill bags for each group with set of unifix cubes use only 3 colors per bag


Place students in pairs or small groups
Have them empty the contents on the table to view the amount of each color of cubes.
Write the color names on a sheet of paper.
Students must predict which color they think will pull out most often when the randomly select a cube. Write the prediction on a sheet of paper.
Place cubes back in bag.
Have students take turns sticking their hand in the bag and selecting a cube(without looking). As they pull a cube from the bag, write down a tally mark for that cube and place the cube back in the bag. Repeat 20 times.
At the end, have students compare the actual results with their prediction.

Next, have students enter their data into a spreadsheet application.
The spreadsheet should look like this:
Column A Column B
color number
red 4
blue 7
green 1


Have the students graph their data. Most spreadsheet programs will allow you to change the color of the bars, lines, etc. Have the students change the color of the bars on their chart to reflect the colors they had in their bag.

Happy Computing!

Tuesday, March 01, 2005

Using Excel for Coordinate Grid mapping

Excel makes a great tool to help extend the old color the square coordinate grid worksheets we give the kids.
The activity I'm including has the students creating a smiley face by using the fill tool in Excel. The activity works even better if you shrink the width of the cell in columns A-Z so that the boxes look like squares. If you don't, your smiley face will be extra wide, but it will still work.

Coordinate Grid Mapping Activity
1. Type your name in cell (A, 1)


2.Use the fill tool on the bottom toolbar to color the following cells yellow. ** ( If you do not see the fill tool or the bottom toolbar click on View - Toolbars- Check Drawing and the tool bar will appear at the bottom. )
3. To change the fill color to yellow.
4. Click on the down arrow to the right of the fill tool and select more colors.
5. Click on yellow.

(A,6) (A,7) (A,8) (A,9) (A,10) (A,11) (A,12) (A, 13) (A,14) (A,15)

(A,16) (A,17) (B,4) (B,5) (B,17) (B,18) (C,2) (C,3) (C,18) (C,19)

(D,1) (D,2) (D,19) (D,20) (E,1) (E,2) (E,19) (E,20) (F,2) (F,3)

(F,18) (F,19) (G,4) (G,5) (G,17) (G,18) (H,6) (H,7) (H,8) (H,9)

(H,10) (H,11) (H,12) (H,13) (H,14) (H,15) (H,16) (H,17)


1. Use the fill tool on the bottom toolbar to color the following cells black.
2. To change the fill color to black.
3. Click on the down arrow to the right of the fill tool and select more colors.
4. Click on black.
(C,7) (C,8) (C,13) (D,14) (E, 14) (F,7) (F,8) (F,13)

Have fun with this activity!


Happy Computing!

Monday, February 14, 2005

Happy Valentine's Day!

Authors realize that schools and teachers are wonderful at promoting their books. Some authors have created wonderful websites to make life a little simpler for teachers.

One of my all time favorites is Jan Brett's site. She has truly created a wonderful site for teachers. Everything from wall alphabets to masks that accompany her stories. Her site can be found at http://www.janbrett.com

Audrey Wood is another one of my favorite authors. Her books are bright and colorful. Her website has the same feel as her books. Her site is found at - http://www.audreywood.com/mac_site/clubhouse/clubhouse_page/clubhouse.htm

Dr. Suess is always a favorite. Suessville is a fun filled place with games and activities. It can be found at http://www.seussville.com/seussville/

Happy Computing!

Friday, February 11, 2005

Tip of the Day February 11th

Planning a multimedia slide is important.

Whether a student is in 1st grade or an adult the thought of sitting in front of a computer with a blank screen waiting for you to fill it with pictures can be a nerve-wracking experience. Without a plan, we spend too much time putting something on the screen and deleting it until we get it just right. By drawing a rough draft of your slide on a sheet of paper, you and your students will save valuable time. You'd be amazed at how well young children can recreate it on the screen.

So the next time you're planning to have your students create either a slide or a complete presentation, give them a sheet of paper and let them plan their rough draft.

Happy Computing!

Tuesday, February 08, 2005

Tip for February 8th

Keep your computer healthy. Over time, your computer builds up "extra" files that can slow it down. Windows has a built in system clean-up. To clear away the extra files go to:
Start--> Programs--> Accessories--> System Tools--> Disk Cleanup
Select your hard drive - generally drive C: and click OK.

The computer will then go through and check to see what it finds that needs to be deleted. If you have had your computer and while and have never done this, it could take a while. When it finishes, if you're sure you want to delete all of the files place checks in all of the boxes and click ok.

This should hopefully make things run a little smoother.

Happy Computing!

Monday, February 07, 2005

Tip for February 7th

I've found a great site that is set up by grade level and covers everything from parts of the computer to database activities. The site is Growing With Technology and is found at http://www.growing.course.com/index.html

The activities come complete with worksheets. The site also has a Spanish version.

Happy Computing!

Saturday, February 05, 2005

Tip of the Day February 5th

Using PowerPoint to Create Flash Cards

Set up the slides so that the first slide contains the term or problem. The second slide contains an answer, picture or definition. Continue alternating until you have set up all of the terms you wish. To create the flash cards click on File --> Print. Under Print What select handouts. Make sure it prints six slides per page. Put glue on the back of the sheet and fold it in half the long way. When the glue dries, cut out the cards. You'll find the term is on the front and the definition is on the back.

Happy Computing!

Friday, February 04, 2005

Tech Tip of the Day for February 4th

Go on an in-class safari. There are many great online animal web cams. My favorites are at the Smithsonian National Zoological Park. http://nationalzoo.si.edu/Animals/WebCams
Find a web cam that would interest your students and open it up full screen on your computer. (Right click on the video, click zoom--> full screen. To minimize it again, press the ESC key.)

As your day permits allow students time to observe the animals. Set up a safari journal near the computer where students can write about what they've seen.


Thursday, February 03, 2005

Technology and Teaching Tip of the Day

Technology and Teaching Tip of the Day

Todays TnT Tip

Using Spreadsheets to Calculate Perimeter and Area of Rectangles

For this activity cut construction paper into rectangles of varying sizes. Provide the students with a ruler and a worksheet that has the following lines for each shape:

Shape 1: Length_________Width__________
Perimeter_____________ Area____________

Have the students measure the rectangles and write the measurements on the worksheet. If you want to make this a self-checking activity, have the students calculate the perimeter and area before putting the information in the spreadsheet.

To set up the spreadsheet for self-checking use the following format:

In cell A1 type Length
In cell B1 type Width
In cell C1 type Perimeter
In cell D1 type Area
In cell C2 type the following formula - =sum((2*a2)+(2*b2))
Press the Enter key
Click back in cell C2 and highlight enough cells under that cell to equal the number of shapes measured
Click Edit--Fill--Down
In cell D2 type the following formula =sum(a2*b2)
Press the Enter key
Click back in cell D2 and highlight the same number of cells in that column as you did in column C
Click Edit--Fill--Down
Save your spreadsheet.

It is now ready for students to use to either calculate the perimeter and area or to check their work.

Happy computing!

Wednesday, February 02, 2005

Welcome!


Thanks for stopping by. Let's get down to business...

Tip of the Day
When integrating technology into your classroom I like to follow the K.I.S.S. (Keep It Simple Silly) principle. Look at things you're already doing in your classroom and see where you can easily extend it with technology.

Today's Examples
1 - For the Kindergarten teacher
Locate or create a poster of a computer keyboard and laminate it. Place it in a location near where you do whole group time. As you introduce new letters to your students point out their location on the keyboard. This helps the students to know the letters are not in alphabetical order and helps them to find their home on the keyboard.

2- For teachers of older students
Reducing fraction self-checking activity
To do this activity students will needed to have completed problems where they reduce fractions to their lowest terms. You'll be setting up a spreadsheet (don't worry I'll give instructions) that will provide the correct answer when they type in the fraction in its original form. During the designated time the students will go to the computer(s) to enter their informatio and check their answers.

To set up the spreadsheet:
1. Open a blank Microsoft Excel workbook or other spreadsheet program
2. Click on the column A heading to highlight the entire column
3. Click Format--Cells
4. Make sure the Number tab has been selected
5. Click on Fraction
6. A Type box will appear
7. Select at least "Up to two digits" otherwise fraction like 1/10 will appear as zero
8. Click OK
9. Save the file to the desired location
10. Demonstrate and provide instructions for completing the activity

Happy Computing!